How I Captured My Surfing Moon Photograph
It all begins with an idea.
This particular brainwave hit me in early 2024. I’m always on the lookout for creative ways to frame my photography subjects, and, well, the moon is basically the universe handing you a giant natural spotlight. All I needed was a subject. But not just any subject—a simple “person standing there” wasn’t going to cut it. No, I needed them doing something. Something intriguing. Dynamic. Maybe even a little absurd. At first, I thought, “How about they sip a glass of wine?” But then I realized I wanted my model to appear entirely within the the glow of the moon—head, feet, and all.
Fast forward to the summer of 2024. The Olympics were on, and like most people, I was glued to the screen. Then I saw the photo—a jaw-dropping image of a surfer, shot by photographer Jerome Brouillet. That photo planted a seed in my brain. Why not a surfer? The board would make a perfect silhouette against the moon, and I happened to have a shortboard sitting at home just waiting for this shot.
On my calendar, I always jot down the full moon dates (because, you know, photographer things). I planned this shoot as soon as the next one rolled around. But, of course, the weather had other plans. Month after month, I was greeted by cloudy skies, prior commitments, or the occasional “oops, I completely forgot.”
Finally, December 15th rolled around, and all the stars (and moon) seemed to align. Clear skies, no obligations—perfect! Except for one small hiccup: it was December in Colorado. If you’ve never experienced it, picture standing in a freezer while someone blasts a 30mph fan at you. My model was understandably... less than thrilled. After some persuasive negotiating (read: borderline begging), she begrudgingly agreed, and I started scouting locations.
Here’s the checklist I needed to make this shot work:
A clear line of sight of at least 100 meters between me and my model.
My location had to be lower than hers so the horizon didn’t bisect the shot.
A clean, natural setting for her to stand in—preferably with some grass or foliage for context.
A perfect lineup: me (in the valley), her (on the hill), and the moon (rising on the horizon).
For the gear, I needed serious zoom power. I settled on the Sony 200-600mm f/5.6–6.3 G lens. It’s no Sony FE 600mm f/4 GM, but let’s face it—dropping $13,000 on a single lens isn’t exactly in the budget. For more firepower, I paired the 200-600mm with a 1.4x teleconverter, boosting my zoom to 840mm. This combo let me make the moon massive in the frame while keeping my model the right size—assuming I could maintain enough distance between us.
To nail all of this, I turned to The Photographer's Ephemeris. It’s basically Google Maps for nerdy outdoor photographers, offering data on sunrise, sunset, moonrise, and even when the last shred of light will disappear from the sky. After some digital research, I found the perfect spot near home.
The stage was set. Now, it was just me, the moon, a surfboard, and one very cold, very patient model.

Luckily, living in Boulder, Colorado, has its perks—namely, an endless supply of hiking trails right in my backyard. I had a strong idea that one of these trails near my home might be the ideal spot for this shot. Using TPE, I dropped a pin on a trail that seemed promising. From there, the app worked its magic, showing me precisely where the moon would rise in the sky based on my location.
If you look at the map above, you’ll notice a red pin with a series of colorful lines radiating outward.
Here’s the breakdown:
The dark orange line points southwest, indicating where the sun will set (at 4:36 p.m.).
The yellow line heading southeast shows where the sun will rise (at 7:16 a.m.).
The dark blue line to the northwest marks the previous day’s moonset (7:55 a.m.).
And finally, the light blue line in the northeast reveals today’s objective: where the moon will rise that evening (at 4:45 p.m.).
Knowing this, I could pinpoint where I needed to stand (the red pin) and figure out that my model had to be positioned somewhere along that line to perfectly align with the moonrise.
Armed with this information, I headed out earlier in the day to scout the trail. My goal was to find two spots along the line—one at a low elevation for me and one higher up for my model. Luckily, it didn’t take long to locate exactly what I was looking for.
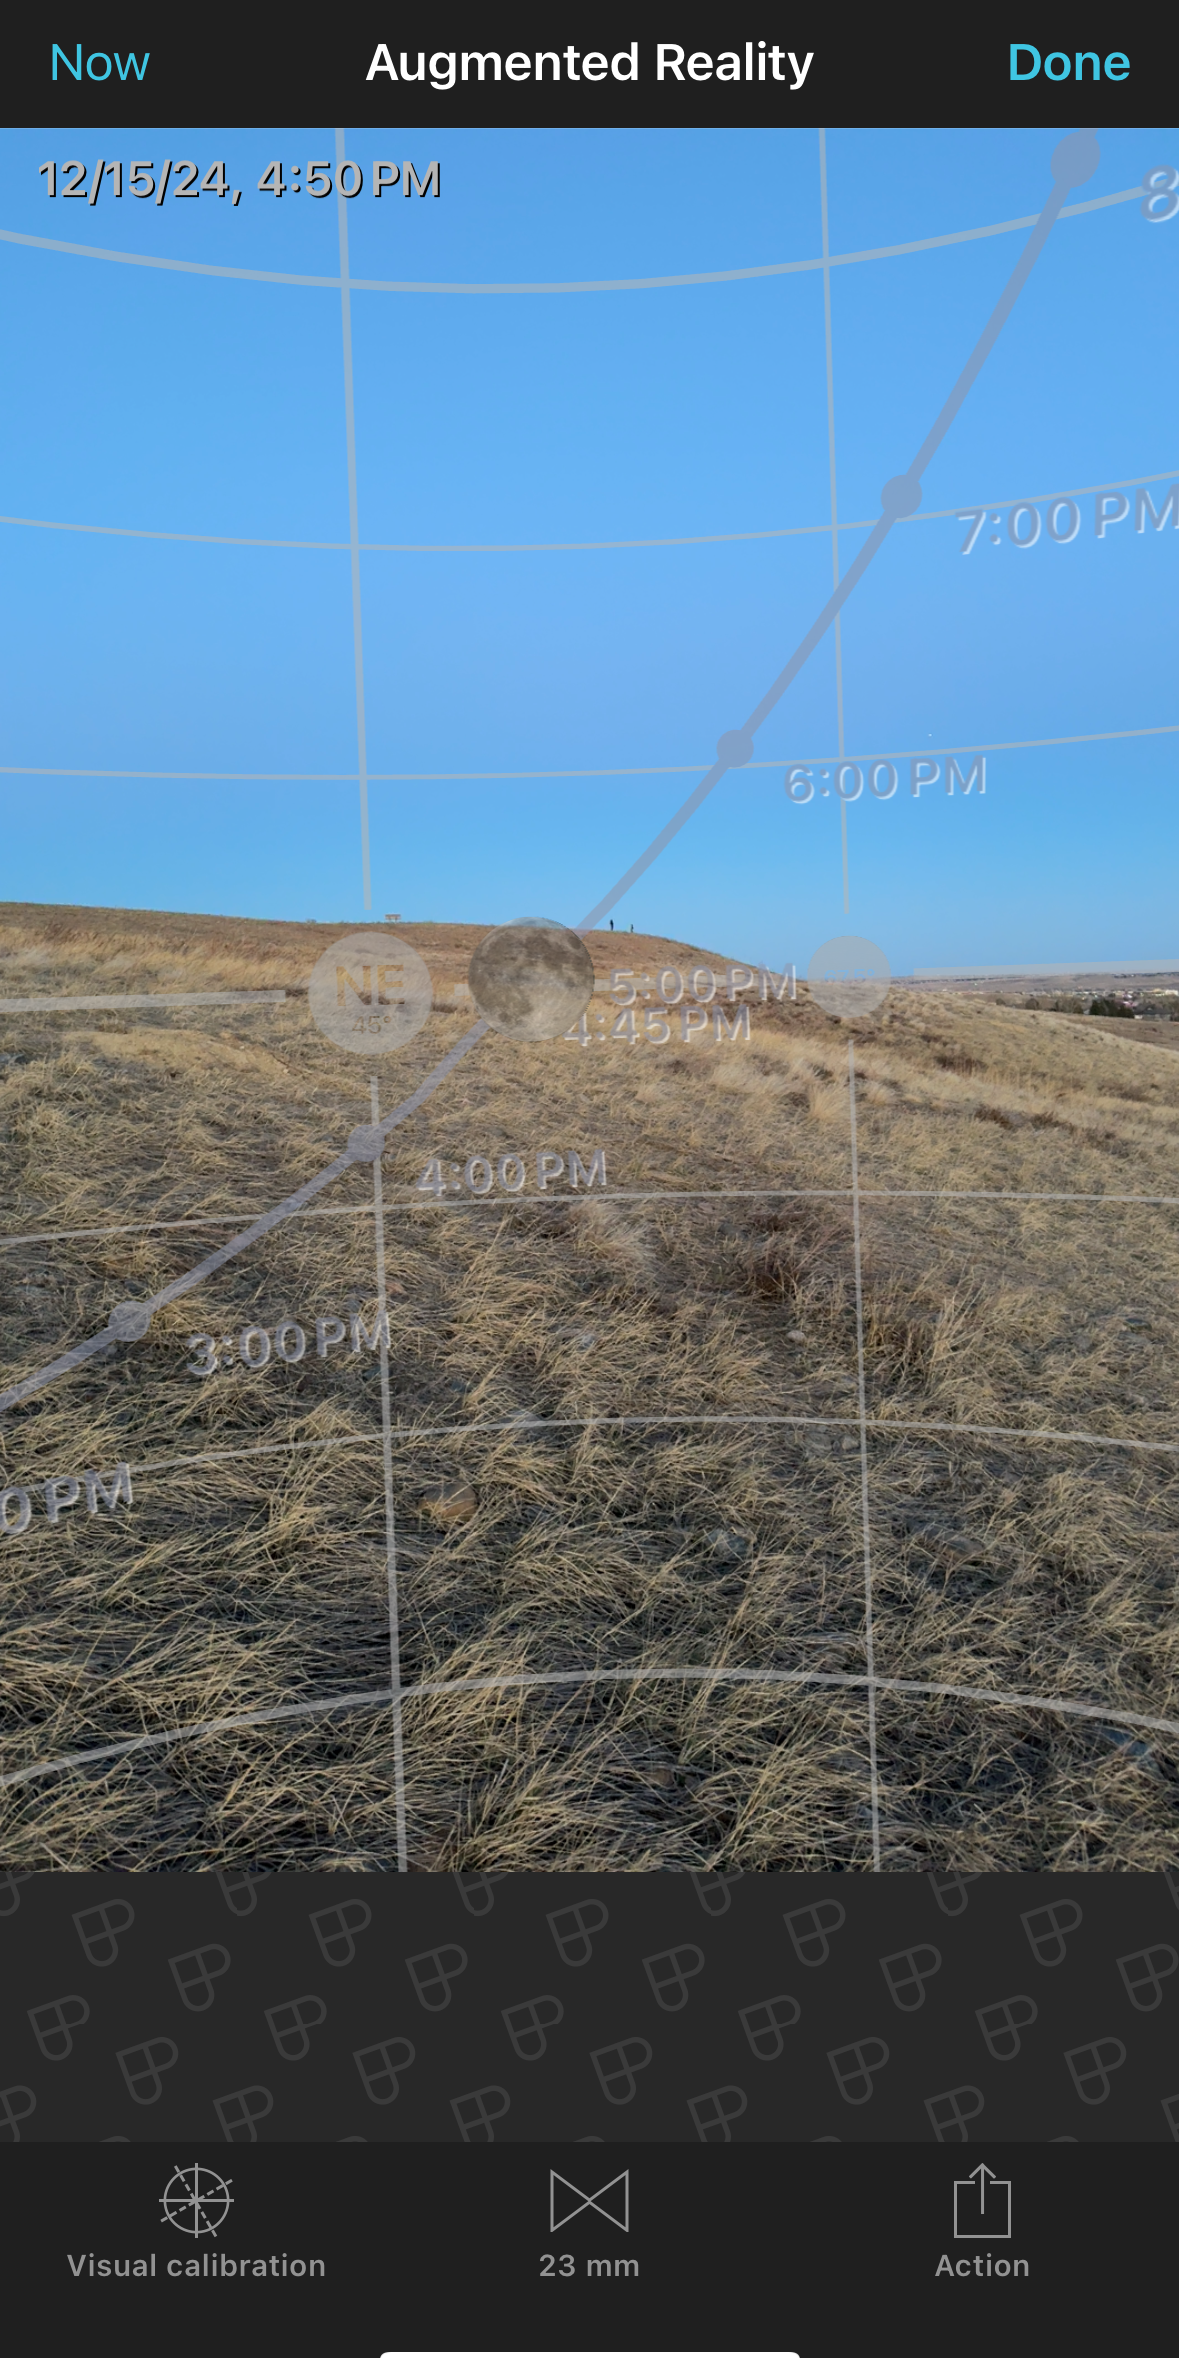
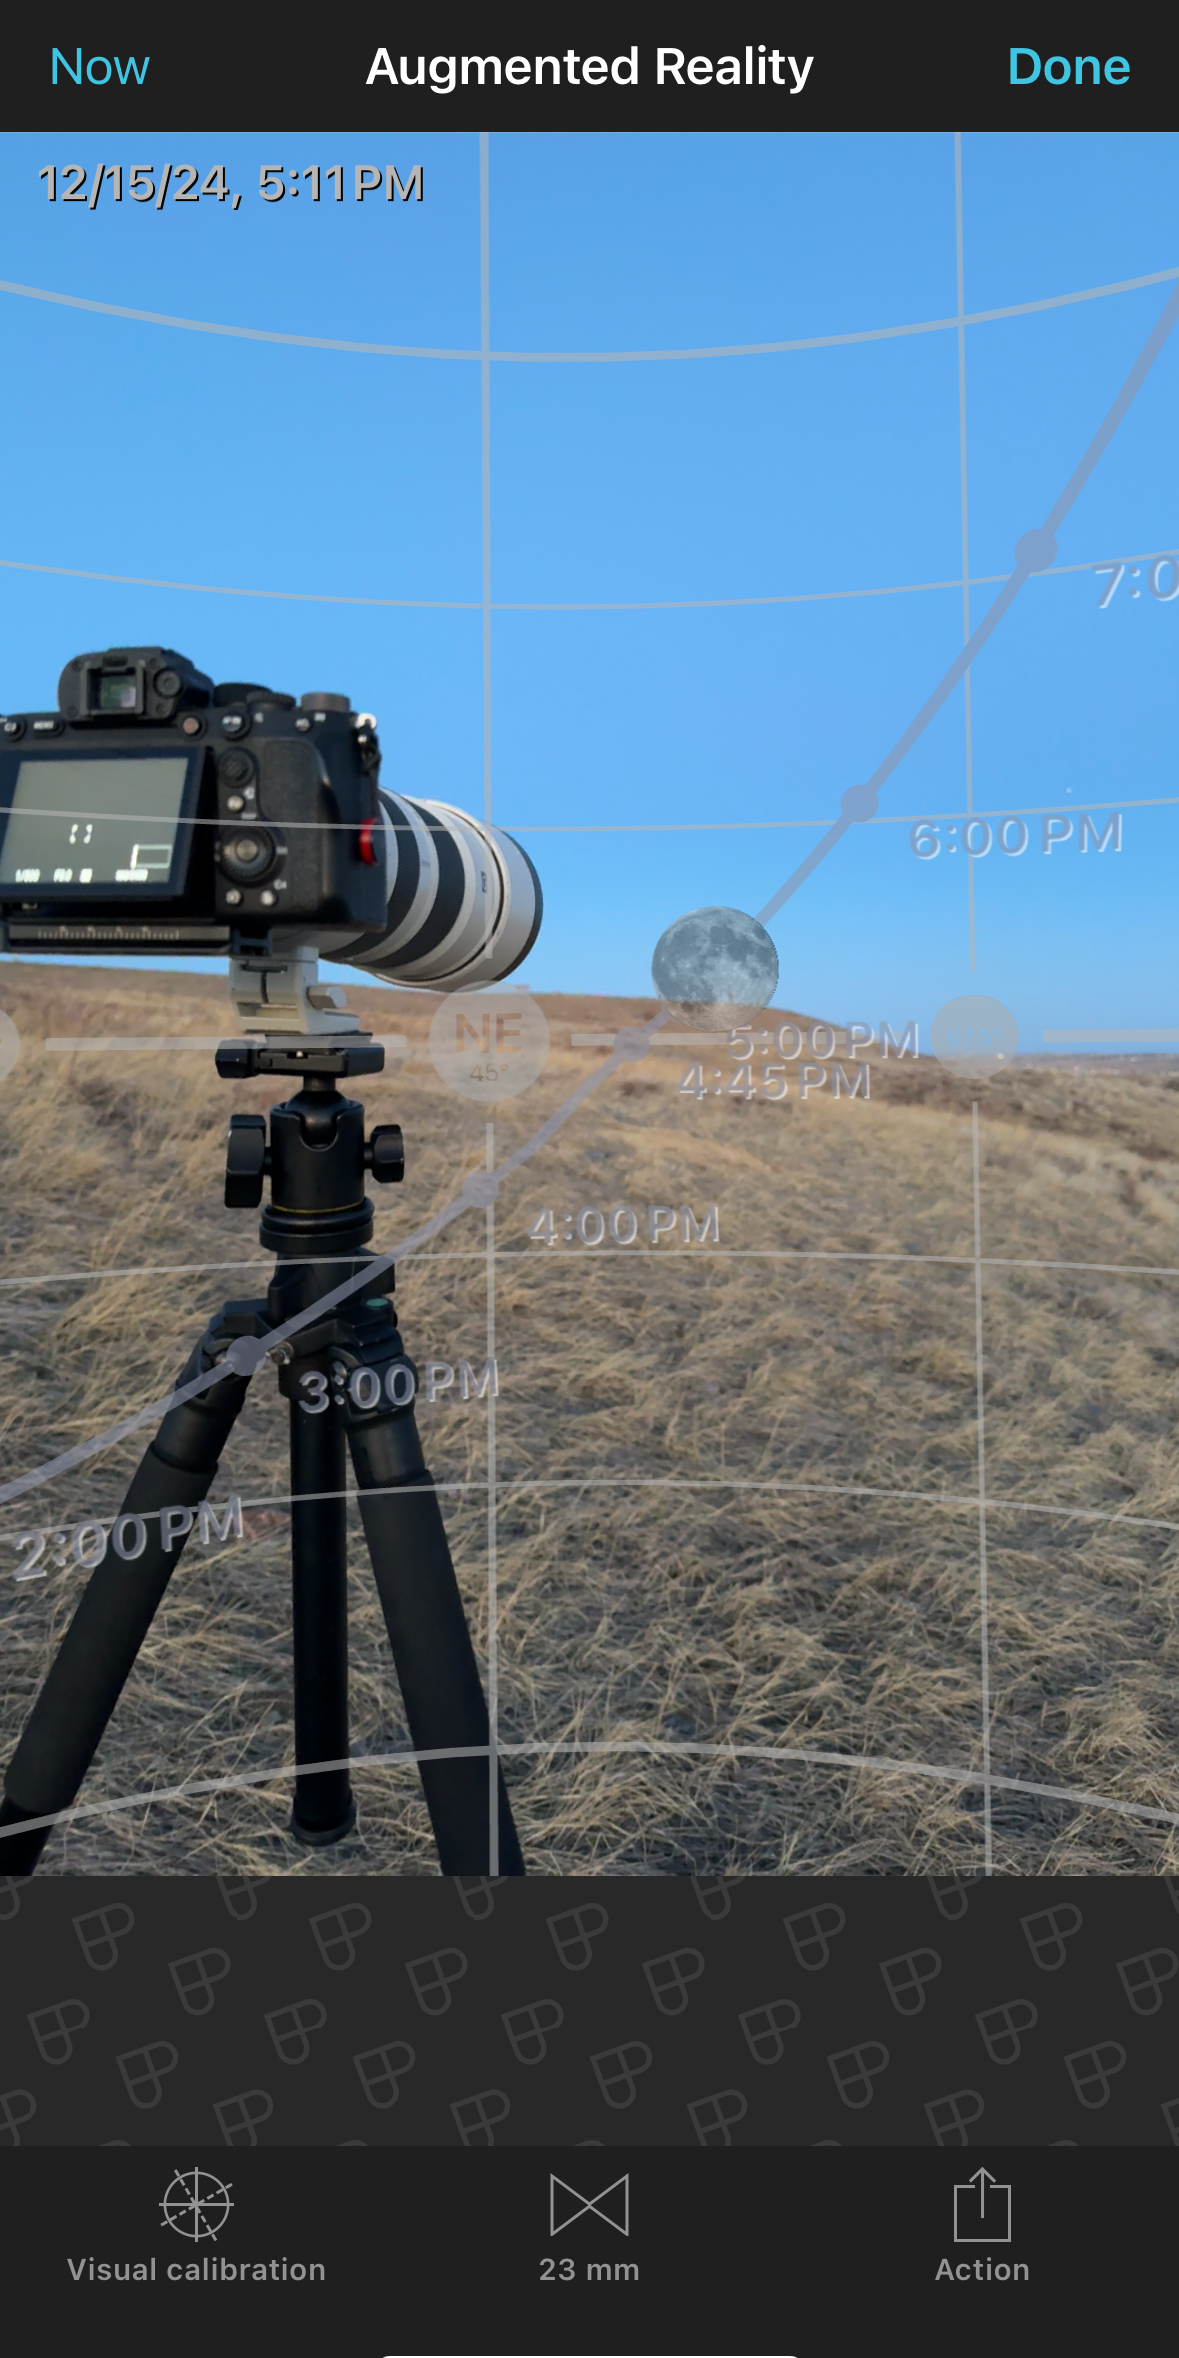
Once on location, I turned to another must-have app for photographers: PhotoPills. This app has an Augmented Reality tool that shows the moonrise location through your phone’s camera. By dragging a timeline back and forth, you can preview exactly where the moon will be at any given moment. After a bit of fiddling, I confirmed that the moon would be in the perfect spot for the shot just after 5 p.m.
With everything lining up so beautifully, I was ready to go. Now all I needed was clear skies, a cooperative model, and several warm layers.

We headed out for the shoot around 4:00 p.m., giving ourselves a bit of extra time in case things didn’t go exactly to plan (because when do they ever?). The sky was crystal clear, and everything seemed to be falling into place. As the moon started to peek over the horizon, I asked my model to shed her heavy winter coat and it was showtime.
The 30 mph winds, however, had their own plans. On one hand, the gusts worked in our favor, giving her hair that perfect "ocean breeze" look and adding a dynamic touch to the photo. On the other hand, those same winds turned the surfboard she was holding into a full-blown wind sail. It was a constant battle to keep it steady, and I’m pretty sure she started to regret agreeing to this whole idea.
In just three minutes (the moon rises quickly!), I managed to fire off 60 shots while doing my best to juggle two challenges: a model being blown across the hill by relentless winds and my own frantic, millimeter-by-millimeter adjustments to keep her perfectly framed within the moon. One tiny misstep, and her silhouette would spill out of the moon entirely.
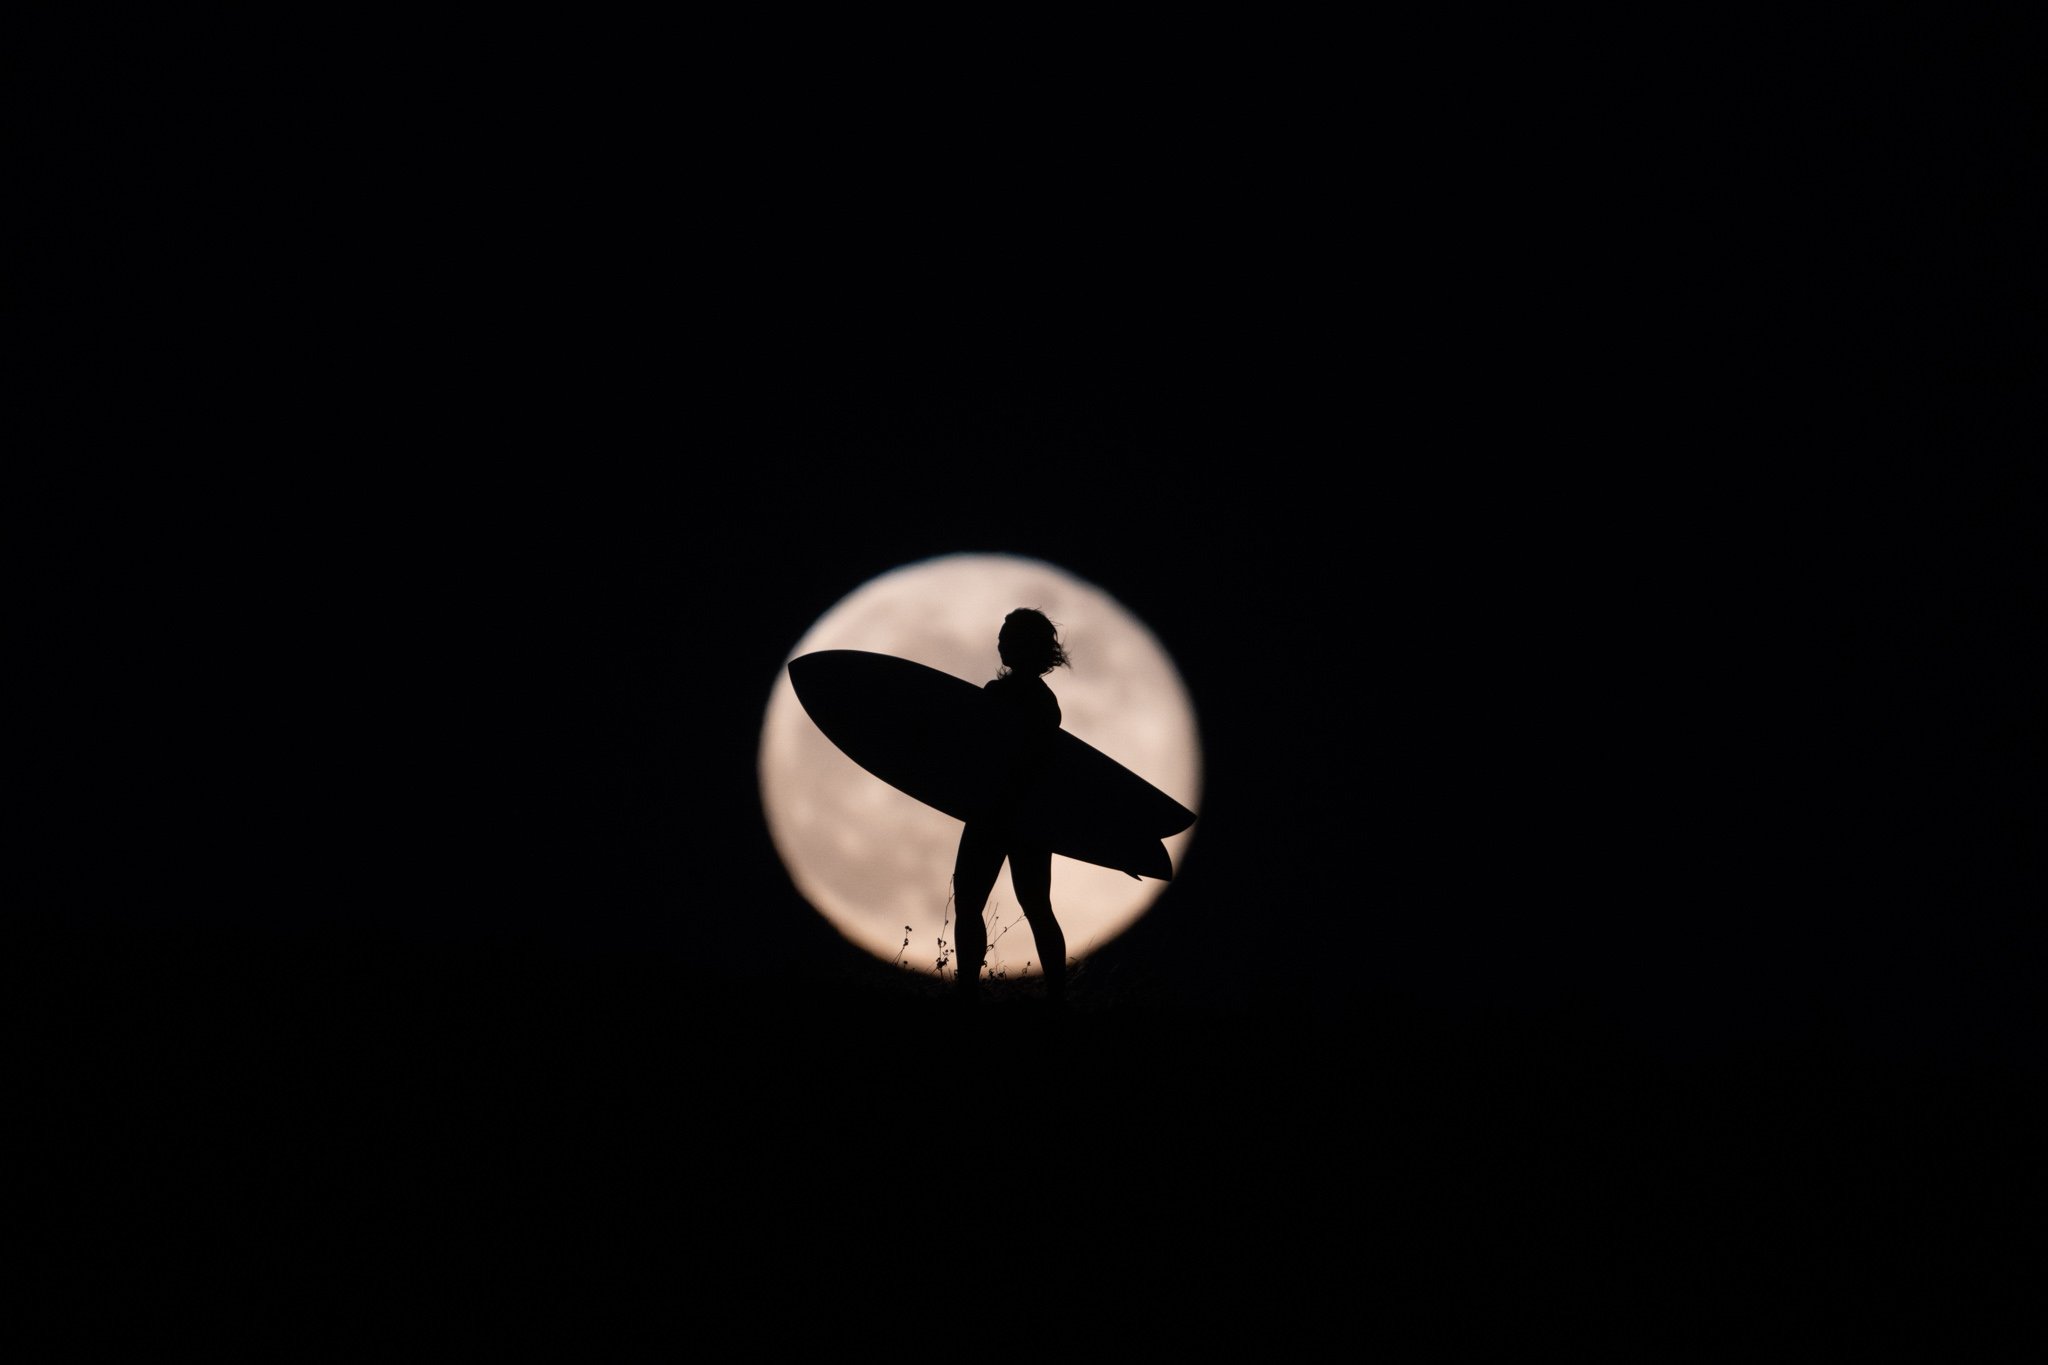
Thankfully, when all was said and done, I had five solid images to choose from—enough to call the shoot a success and let us retreat back to the warm vehicles.

The chosen capture was taken at 1/500th of a second, f/9, and ISO 3200. While the Sony a7R IV is a fantastic high-resolution camera, it does have a tendency to introduce more noise at higher ISOs than I’d like. That said, editing this photo turned out to be relatively straightforward - something I always appreciate as some of my edits can take hours.
I started with Lightroom's AI Denoise feature, which has become a reliable tool for taming high-ISO noise. This gave me a solid base to work with.
Next, I boosted the exposure by about two stops to bring back the rich blue tones in the sky. While I loved the drama of the darker image, it needed more separation between the ground and the sky to create depth. Bonus: increasing the exposure revealed a lovely rim light around the plants at her feet, adding a nice touch of detail.
Finally, I brought down the highlights in the moon to restore its texture and gave the orange hues a saturation boost to create a striking contrast with the cool blue sky.


A bit more noise reduction, sharpening, and a tiny crop, and the image is ready for print.
What do you think? Worth the effort?
